Why restricting user consents for Azure Active Directory Enterprise applications changes corporate software governance and security posture
Microsoft 365 consist of slightly more than 25.000 settings, ranging from service activation/deactivation to radical changes in application behaviors. Being a good consultant is knowing the Microsoft mantra of “allow everything and let the customer restrict what they don’t need” is a security risk, being a great consultant is knowing what to fix and why. User consent to applications is one of the biggest risks to data and privilege security right now, to the point where malicious consent requests have become a common attack vector for cloud first companies.
Graph API – a primer
Before we start to talk about providing rights and restricting consent, we need to know what we’re providing consent to. Let’s use an example. The first time you log on to an iOS device “mail” application using your company credentials, you’ll be asked to provide consent to activate Exchange ActiveSync (EAS) through the privileges assigned to the application. The request looks something like this:

As you can tell from the picture above, you’re allowing the application to:
– Access mailboxes over Exchange ActiveSync
– Access mailboxes as the signed-in user via Exchange Web Services
– Sign in and read user profile
And you’re activating all of these rights for all the users in the organization.
Privileges are provided on an allow or soft deny structure, where everything you don’t explicitly allow the application to do is not allowed. When users themselves activate the privileges in Graph API, they look like this in the Enterprise Application structure:

Notice how the rights say “User.Read” instead of “Directory.Read”, denoting the rights scope directly in the permission given. The requests are built the same way a powershell command, using subject-verb pairs – like User (subject) . Read (verb).
Enterprise applications, rights and what to look for
One of the most important things you can do when you start auditing Azure AD Enterprise applications is to check the Permissions allowed on each page. You can find it by accessing the “permissions” link under the security context.

Here you’ll see the two Permission methods, user and administrator. We’ll cover what they mean in the next chapter of this article, but there are many rights you should be very wary about granting.
Any right containing the designation “All” should always be carefully audited. However, it requires administrator consent to be provided to allow the access.
Delegated vs Application rights
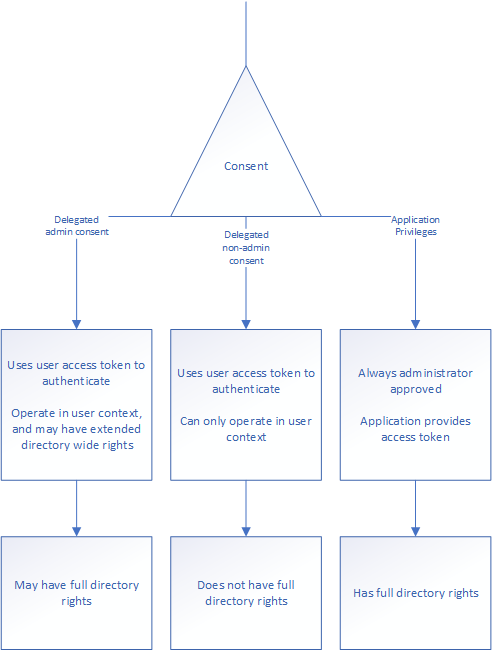
The difference between these two systems are connected to how the enterprise application interacts with the privileges. The delegated rights are connected to the user who logs in to the application and is used to allow the application to access Graph API through the user’s access token. The application rights are used to permanently provide the application with the given rights without having a user present. These privileges are commonly granted to applications running Daemons or background processes.
To explain, here’s a hypothetical calendar application, first explained with delegated rights, then application rights and then I will post both combined:
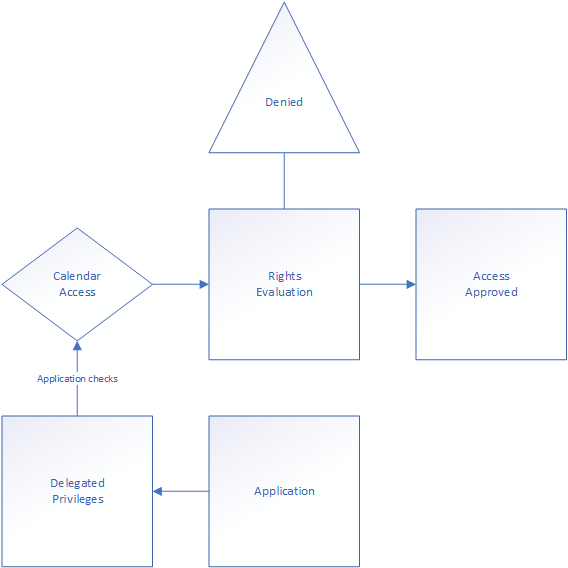
The application uses delegated privileges to provide a view into to the several users’ calendars. This means the user must be already have the rights to the calendars before access is provided. In addition will the application stop functioning by a user simply changing the access rules in Outlook. Here’s a more detailed reference map:
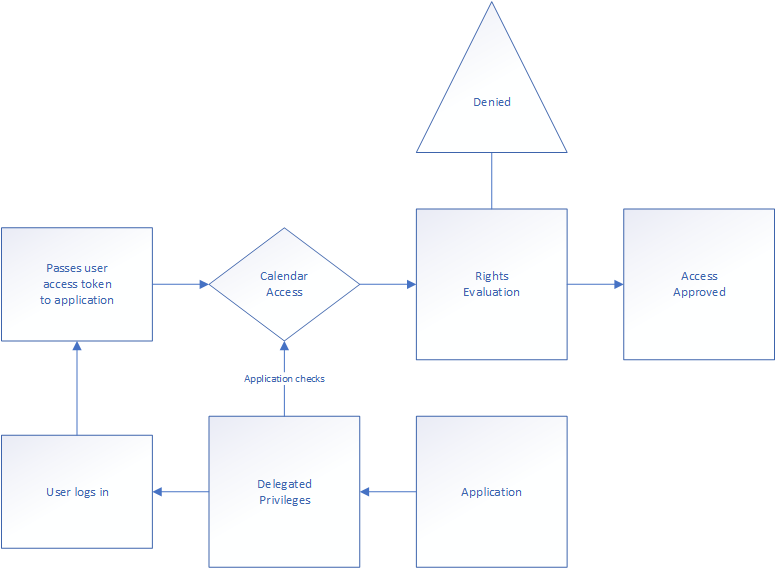
The application depends on the user’s pre-existing access because the right is only available given to it by the user’s access token. The core concept is connected to the application’s access key functionality. I’ve drawn the logic here:
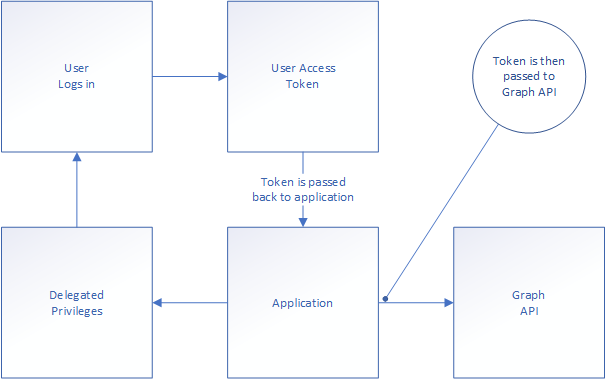
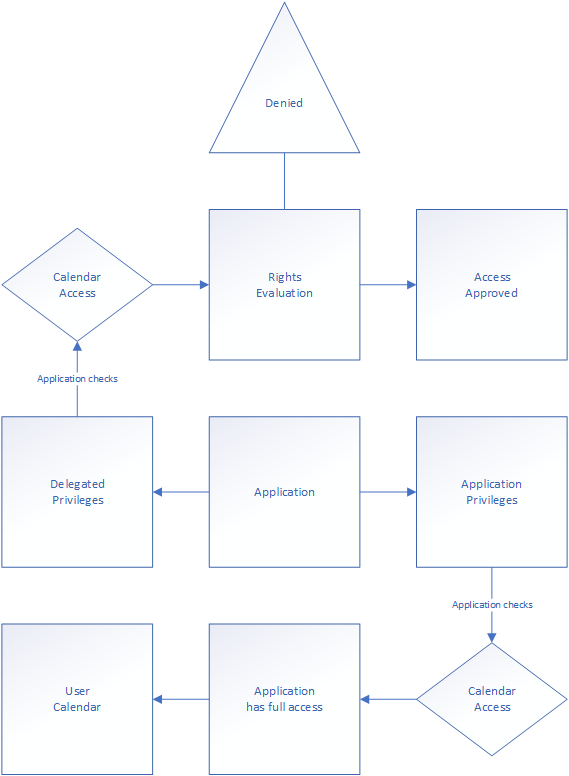
It’s a simple process, but it neatly explains why the application is dependent on users access. When we look at the application privilege we see how it’s configured using the application’s own access. This makes the user’s privileges irrelevant in the rights evaluation. When applications do not need user interaction, take for instance QRadar (an IBM SIEM (security information and event management) solution), who simply needs access to the activity log in order to read it – it can be provided with application privileges, allowing unfettered access. This is often called Daemon applications, as there are no user interaction needed. If however, the application interacts using the user’s context, the application will need to use delegated access. That’s where the administrator consent comes in when the application is used by the entire directory.
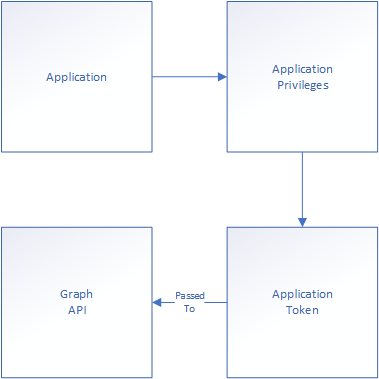
This makes much better sense when we look at the application (using application privileges) overview:
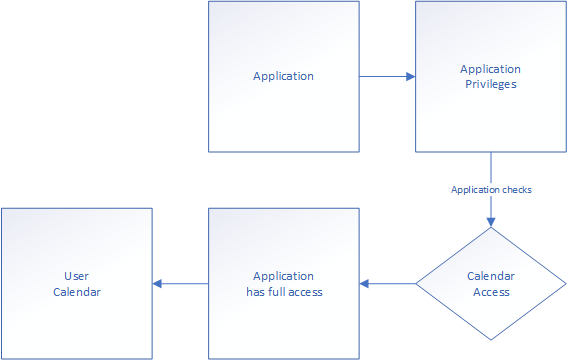
When the user logs in to the application it allows the user to authenticate with the application provided access token to view other users’ calendars. What’s being used then is the administrator given application API privileges like this:

As you can see, advanced applications can use some application permissions and other delegated. This is up to the application’s requirements and how it works on the back-end.
I’ve drawn up the application with both sides available to show how it looks on both sides.
Drawing up the consent function shows how delegated rights with or without admin consent and application privileges to the graph API is handled by the service functions:
Now back to some of the rights that should trigger a close audit of the application:
Microsoft Graph
– Any application permissions
– AuditLog.Read.All
– BitlockerKey.Read.All or BitlockerKey.ReadBasic.All
– Device.Command (no admin consent required)
– DeviceManagementConfiguration.ReadWrite.All
– EAS.AccessAsUser.All (no admin consent required)
– eDiscovery.ReadWrite.All
– EWS.AccessAsUser.All
– File.ReadWrite.All (no admin consent required)
– Mail.ReadWrite.All (no admin consent required)
– User.ReadWrite.All
Remember: Any API privilege given to an application is an allowed action. Allowing apps to perform eDiscovery for instance is super insecure. Anything you don’t want users to do, should not be permitted for an application.
You need to be very consistent about what your organization allows and rejects. I usually say the organizations should sit down and write down a complete list of what the organization thinks are OK rights to provide, and what it finds to be too much. This would help evaluate applications when the administrator consent requests come in.
Consent and how it’s given
Not all consent is created equal. There are two different methods to allow an application access to your data. As I described above, you can use administrator consent to configure all of your organization to access an application with higher privileges. But you can use user-consent as long as it’s required privileges are not provided to the “directory.all” level, or the privileges are set to “administrator consent required: no”. Take the user Graph API delegated privilege:

As you can tell on the right side; administrator consent is not required for the “user.read”, “User.read.basic.all” and “User.readwrite” levels. Some of these are tenant level, and others are user level, but none of them require administrator consent to be given. The users who provide the consent allow the application access to their access token and some privileges deemed non-sensitive.
Take for instance the Gmail enterprise application found in one of our test-tenants:

Here, one user allowed the application the following access:
– offline_access
Allows the application to keep data it’s been provided access to offline. In my last post: Conditional Inaccessibility I explained what the refresh token is, and this privilege allows the longest available refresh token to be issued to the application. Access tokens usually expire after an hour, the refresh token expiration is after significantly longer.
– EAS.AccessAsUser.All
Allows for the application to access the Exchange Online platform over the Exchange ActiveSync protocol as the logged in user.
As none of these privileges require administrator consent, the application can be added to the Azure Active Directory by any user at any time in the standard configuration. This means the user can override the administrator configuration on access protocols without administrator consent by default.
How to restrict user consent abilities
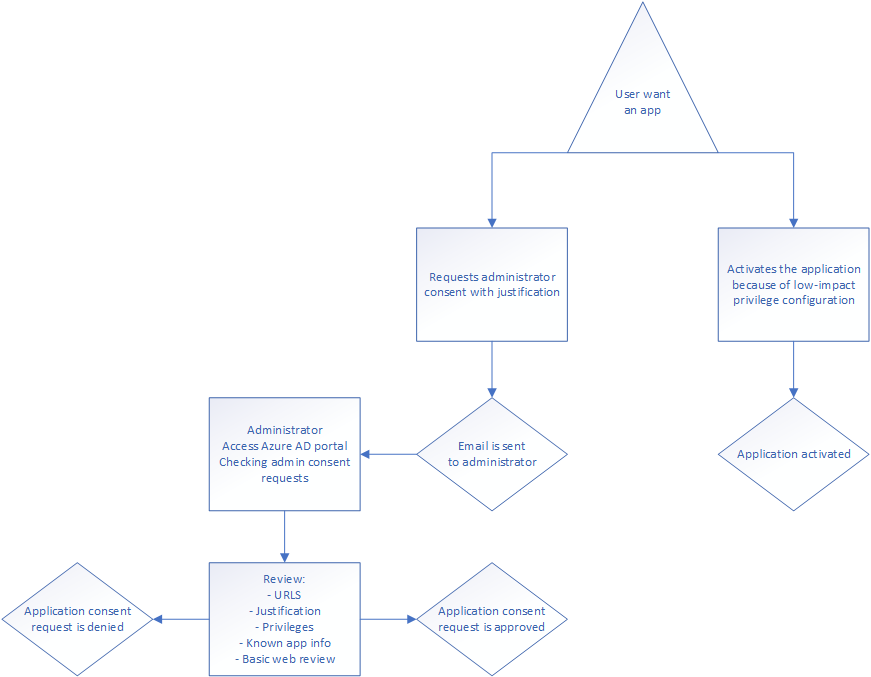
So, by now you understand how the application rights and privileges structures work. But how do you restrict users from activating applications you as an administrator don’t want in your directory? You turn on administrator consent flows and restrict user app registration functionality. Or, you can be a nice administrator and pinpoint what privileges you deem “low impact” and activate flows depending on the privileges requested.
Personally, I wholeheartedly believe in restricting registration of any application until it has been audited by an administrator, but I understand the idea of allowing certain privileges in larger organizations where forcing administrator consents is too time consuming to be worth the security returns.
The two systems are drawn up here. I’ll go through below how to set it up.
Low impact configuration
Go to the Azure portal\Azure Active Directory and then to: Enterprise Applications\Consent and permissions\Permission classification. The page should look something like this:
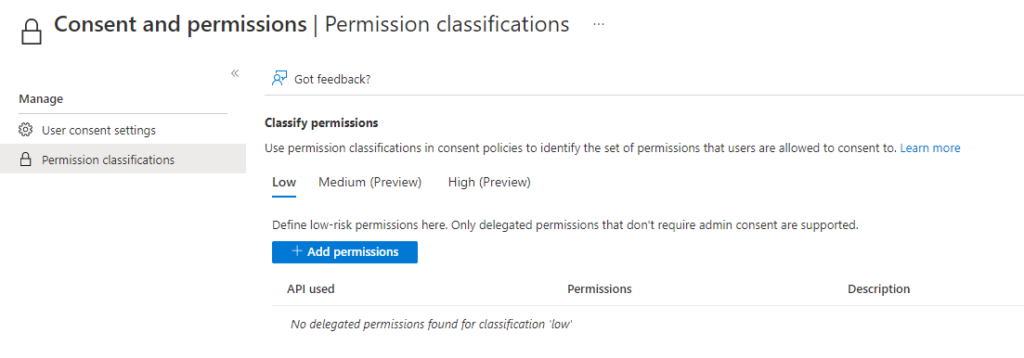
There are three different classification levels:
Low
Medium (preview)
High (preview)
Medium and high are currently only configured to be text labels, meaning there doesn’t seem to be any changes in the configuration or flow depending on the level registration, because the low impact process only supports the privileges configured in “low impact”, leaving the point of the others as currently unknown. The only privileges supported by the low-impact process are delegated rights without administrator consent.
In the Enterprise Applications\Consent and permissions\User consent settings you’ll find the following settings:

These configure how consent works. In our test-tenant, we’re currently using the default setting (all users can consent for apps, even when they require access to organizational data, tisk tisk). If you’re planning on using the “Low impact configuration” solution, you’ll have to configure the middle option: “Allow user consent for apps from verified publishers, for selected permissions”. This is in addition the recommended option from Microsoft.
Then the flow shows the number of privileges configured in the “low impact” category. If you activate it, users will be able to freely consent to applications requiring these privileges, but will have to request administrator consent to privileges not registered in the “low impact” category. Activating all the standard OpenID privileges looks like this:

Then you can go back to the User consent settings and configure the “low impact” flow, like this:

Note how there are now 5 permissions classified as “low-impact”.
Administrator consent flow
My personal go-to. I don’t trust users to not provide applications with too many privileges. Users, just care if the application will work or not. What’s going on in the back-end rarely matters to them. However, this makes them prone to security taking a backseat to productivity, and creating shadow IT for organizations.
If you go to Enterprise Applications\User Settings you’ll find a setting called “Admin consent requests”. It should look something like this:

Flipp it to “Yes” in the top and configure a group or role, configure email requests and reminder settings, timeout settings and whether users can see non MS365 applications in the “MyApps” panel. It should look something like this when you’re done:

I usually configure it like this, with a dynamic group in the background. This would allow me to configure all users in the IT department to function as Enterprise Application approvers in the end. The reason for using 30 days is to allow for delay and to make certain time isn’t a deciding factor. A lot of companies use 7 days as a deadline, but knowing “Norway time”, I usually opt for 30 days to allow for some leeway.
Remember, you’ll need to return to the Enterprise applications\Consent and permissions\User consent settings to configure “Do not allow user consent, to force any new application through the “Administrator consent” flow.
How does this look for the user?
I’ll run through an application request on a user side. I’m going to activate the Enterprise application “Kahoot!” just for fun. When you go to Kahoot’s webpage, you’ll get the question to use Microsoft as the Identity Provider for your Kahoot account. You will have to press the “Continue with Microsoft” button to be taken to the next step.

You will be taken to the login.microsoft.com domain for a login. I’m already logged in on this browser window so I’m getting to the admin consent request page:

You’ll have to fill it out and request approval. I fill it out like this and press the “Request approval” button:

Pressing the “Request approval” button provides you with this window:

Letting you know your request was successfully sent to the approver group for examination and potentially accept. Back on the admin side, we’ll first get an email telling us there’s an application awaiting your administrator’s consent. Go to Enterprise Applications\Activity\Admin consent requests on the left side:

On this page you’ll see the app waiting for you, like this:

Visiting the application, you’ll find the response URLs configured configured in the application denoting what URLs are used to visit the application, login return and logout return. These are required URLs because they’re necessary for the login application to forward the user to the right place, and to confirm the return claims of the login-process. We’ll have to talk about how SAML and ADFS works in a later article.

It’s Kahoot! so it’s nothing really interesting here, but beware for applications who use “http://localhost” or .biz / .info webpage URLs. If you wouldn’t press it in an email, don’t allow it access to your directory. I’ll go more into warning signs a little later in the article.

In the “Requested by” tab, you’ll find who requested the application and the justification provided. You’ll have to be a little sneaky to read it all in this panel, but you can hover over the “justification” part for a little more of it. Users don’t usually provide more than 4-5 words of justification. Meaning I’ve done myself a disservice writing two sentences here. When you have gleaned all you can get of interesting details from the “Details” panel. Press the:

Button to go to the consent page. As the administrator providing consent, you take the place of the user in the process when you review permissions and provide consent – pressing the button.

Here you see the administrator panel. If you’re happy with the required permissions and you’re willing to provide administrator consent, you can press the “Accept” button in blue. I’ll show you how to restrict or remove permissions afterwards. After pressing the “Accept” button you’ll be returned to the administrator consent page, with one less application. Waiting a few seconds and then checking the registered enterprise application list for Kahoot! you’ll find:

Visiting the “Permissions” tab in the Enterprise Application you’ll find the permissions you’ve just granted:

And as we remember from further up in the article, we’ve allowed all users to use this application now. This is the first major pitfall of administrator consent flows. When you allow an application using the administrator consent flow, you allow it for everyone. It removes the user-centric consent flow, and allows all users to access the application without approving consent after administrator consent is given.
I did a boop and approved an application I shouldn’t. How do I revoke the privileges?
There are two ways to remove access for an application. Deletion, or permission review. The two different structures are used for different things:
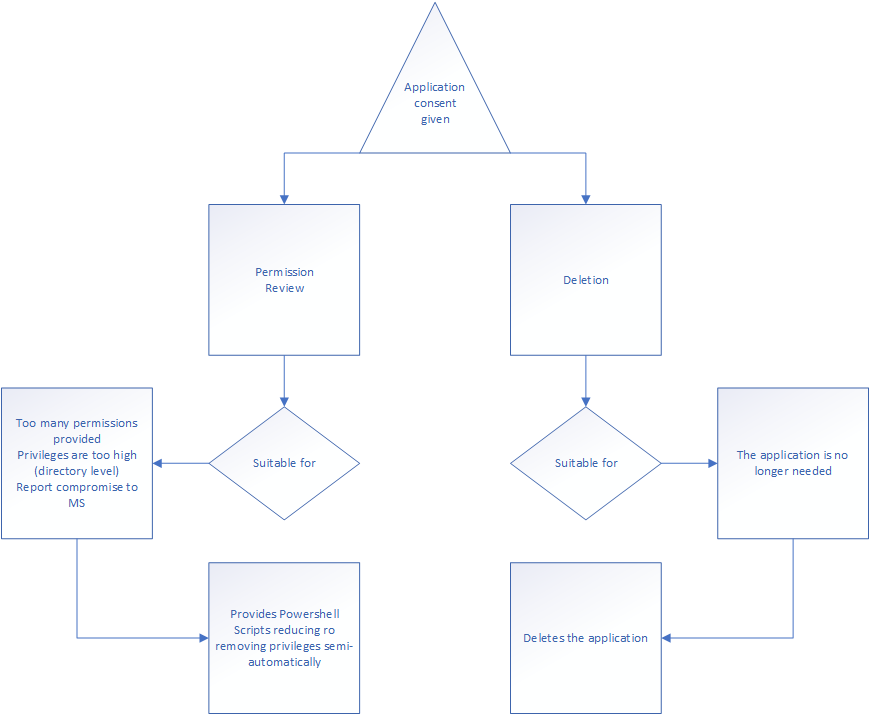
Choosing between deletion and permission review is simple. Consider whether you want to use the application going forward, or if you just want to remove a consent you have previously granted the application. Deletion is simple enough. Go to the application you want to get rid of, and then visit Properties\Delete.

When you press the “Delete” button, you’ll be prompted by the following window:

Pressing “Yes” removes the application and returns you to the Enterprise application overview window. If however you’re looking to simply limit the application’s rights, you’ll have to perform a different process. Accessing the Permissions link in the enterprise application will provide you with the option to run an access review.

When you visit Permissions here, you’ll find the “Review Permissions” option in the top of the page:

And triggering it you’ll get the following fly-out:

Using the different options, you’ll get different workflows and scripts to run. As permissions are not easily configured in the portals, you’ll have to use the powershell solution in order to effectively revoke the privileges from the Graph API. Choosing for instance “I want to control access to this application” will provide you the following workflow:

Whom do you trust? A question for administrator consent requests
Okay, so far we’ve configured administrator consents workflows, assigned a group of grantors and provided them with emails to inform them of the requests coming in. But whom do you trust to perform the necessary confirmation workflows and not make the wrong choices when it comes to requests coming in?
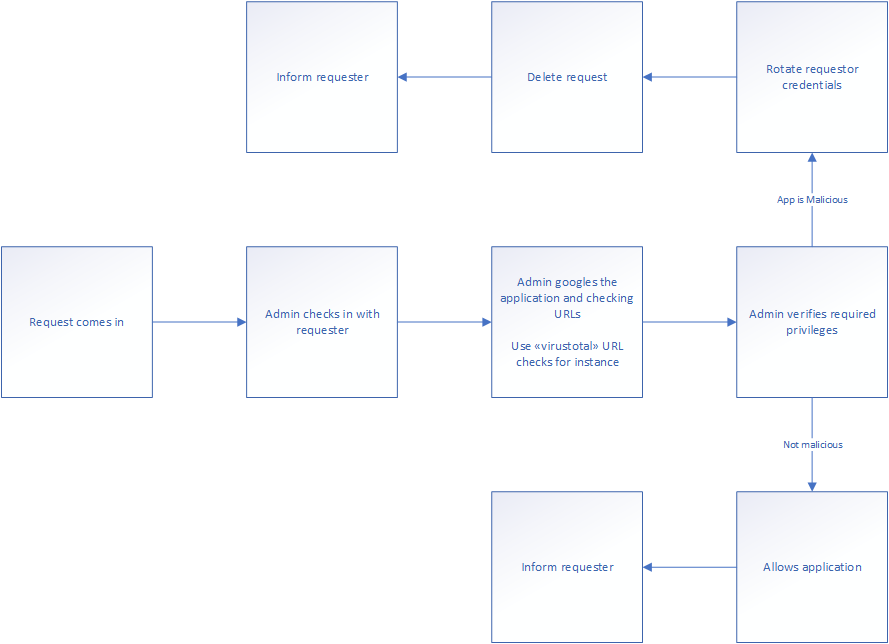
You will have to build a process defining what is considered a “good enough” review depending on your corporate security posture. As I wrote in the “Right to life” document for this blog, 95% of IT consultant jobs are communication requirements, not technical. Checking in with the app requester is one of the most important parts of the administrator consent structure. The user will be able to confirm the request, describe why it’s needed and what it’s going to be used for. This should be noted and stored in the organization’s quality assurance system for later review.
What to look for in your administrator consent requests
Defining what to look for is difficult as it is determined by what you’re assigning risk to, but there are quite a few things to be wary of. First of all is any high-privilege application with http://localhost return URLs. An example of an application with these URLs are “Plumsail Actions”:

I’m not saying “Plumsail actions” is malicious – it’s not, but it’s an application I’d be carefull activating. Following the process detailed above, I’d check the requested privileges:

The application requires mainly SharePoint privileges. When checking the documentation for the application you’ll find the following:

The application is a SharePoint to Logic-App / Power Automate connector, allowing much greater SharePoint control and access. Plumsail also has several big names as partners in their portfolio, leading me to think it’s an established company.

With Norwegian partners. Checking the SSL certificate it uses a valid Cloudflare provided certificate, and a quick whois lookup reveals the domain was first registered in 2012.

I contact the registrant asking why the application is necessary. They reveal it’s because the organization uses the Plumsail SharePoint connector to provide an automatic Teams / Sharepoint creation when the company registers a new project. Noting down this information in the quality assurance application, we can safely confirm the application is not malicious, requested by intention and has no more than necessary rights and privileges to perform the functionality it is intended for.
Teams application restrictions
Teams is the “new” collaboration software we’ve all been marinaded in over Corona. It’s a wonderful system when it works, but it’s a major security risk you need to be aware of considering it’s highly customizable, scalable and allows for indiscriminate sharing of data. I’m not going to enter how to fix security holes in Teams and how to restrict it’s functionality in this article – but we’ll have a look at restricting application registration and integration in Teams.
As the application allows integration, we’ll run in to the same issues here as we did in the Enterprise Application registration functionality. The application doesn’t necessarily honor the same policies as Enterprise Applications, as it depends on the level of integration required by the enabled applications. In the Teams admin center you’ll find the following option under “Teams apps”\”Permission policies“.

The functionality of this tab is to allow you – the administrator – to restrict what kind of ability the users have in integrating applications into Teams. You can of cause register a different policy than the Global one, allowing you to classify the abilities of the users through policy assignment. In essence, you can have:
User: Greg Normaluser – Global policy (restrictive)
User: Hans SuperUser – Less restrictive policy
User: Johan Developer – Developer policy (allows custom)
User: Christian Administrator – Allow all policy
But it’s up to you. The Global policy is commonly the only one configured, unless you’re meeting a company with a stringent privilege policy structure. Here’s one from an OOBE (Out Of the Box Experience – or simply “default”) configuration:

It looks like this as a standard. Remember what we said in the top of this article? By default, Microsoft allows everything. It’s up to the customer to restrict functionality to only what it needs.

There are several options you can configure in order to restrict the access.

Allow all apps
This is the default setting, with no restrictions.
Allow specific and block all others
My favorite. If you want to choose what applications the user can activate, use this one.
Block specific apps and allow all others
This one is really useful, if you’re looking to block only a few applications. Take for instance the need to block out a competitors application, but you don’t want to restrict any other integrations. Then this one is for you.
Block all apps
I mainly use this one in situations where the organization doesn’t develop it’s own applications, and in restrictive policies. The baseline policy I run for common users is this one:

Closing arguments
Restricting enterprise application consents is one of the best changes you as a consultant can do to keep organizations safe. This kind of privilege assignment should never be in the hands of the common users. The ramifications of not keeping to best practices configuration in this sense opens the organization to abuse through a simple enterprise application with email rights.
We’ve gone through both best practices configurations, how the functions, rights and processes work and what you should consider when building your policies.
I’ve attached the core drawings for your perusal and download below should you need it.
Thank you for reading
If you’ve read this and would like to say thanks or have any feedback, let me know on Linkedin!
I posted the right to life page explaining why I’m writing this blog and noting down some of my experiences as a consultant. If you’re just getting started as a consultant, maybe there’s something there for you. Even if I made mistakes doesn’t mean you have to.
/James