Why SharePoint is a good solution for online document storage and intranet functionality, but not out of the box.
First we’ll need to define the difference between Microsoft SharePoint, Teams and OneDrive. To the non-technical user it may seem like it’s three different systems, but there are complexities to be aware of in their separation. They are not three different systems, but rather eight systems and a bunch of extensions working in collaboration. It started with SharePoint, which expanded with OneDrive, and Teams was a mixture between Azure Active Directory, OneDrive, SharePoint, Skype for Business, Exchange Online, Planner, Yammer and Stream functionality with one “unified” and customizable user front end.
We need to consider who owns what when we’re talking about collaboration software. OneDrive, SharePoint and Teams all have different ownership and privilege structures your users need to consider in order to make informed choices on where to put the files they produce:
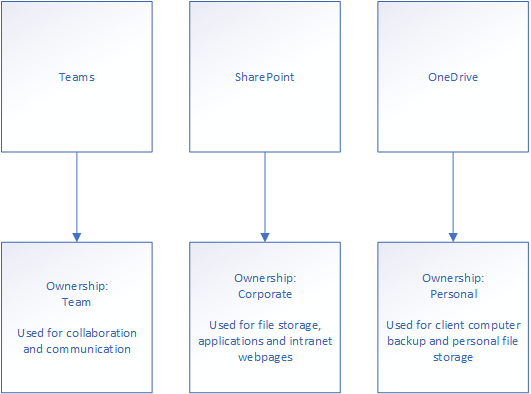
Making users aware of what the different services are and what they are designed to do is the key to a successful cloud collaboration adoption process.
In this article we’ll talk about how these services work and how to secure document sharing for different customer configurations and how to configure good SharePoint structures for customer solutions. But first we’ll have a quick look of what Teams really is and how some of these systems work together. I drew up a confusing overview just for fun, but Microsoft drew it better – see below.
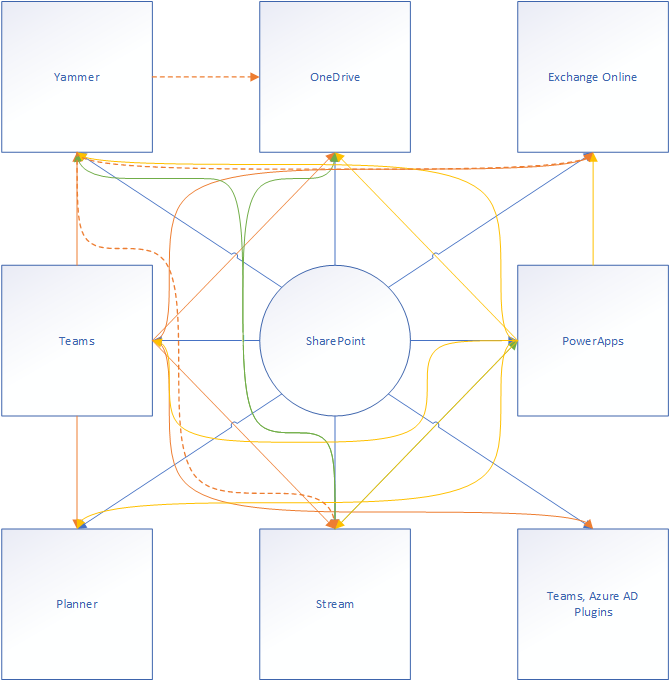
Service relationships
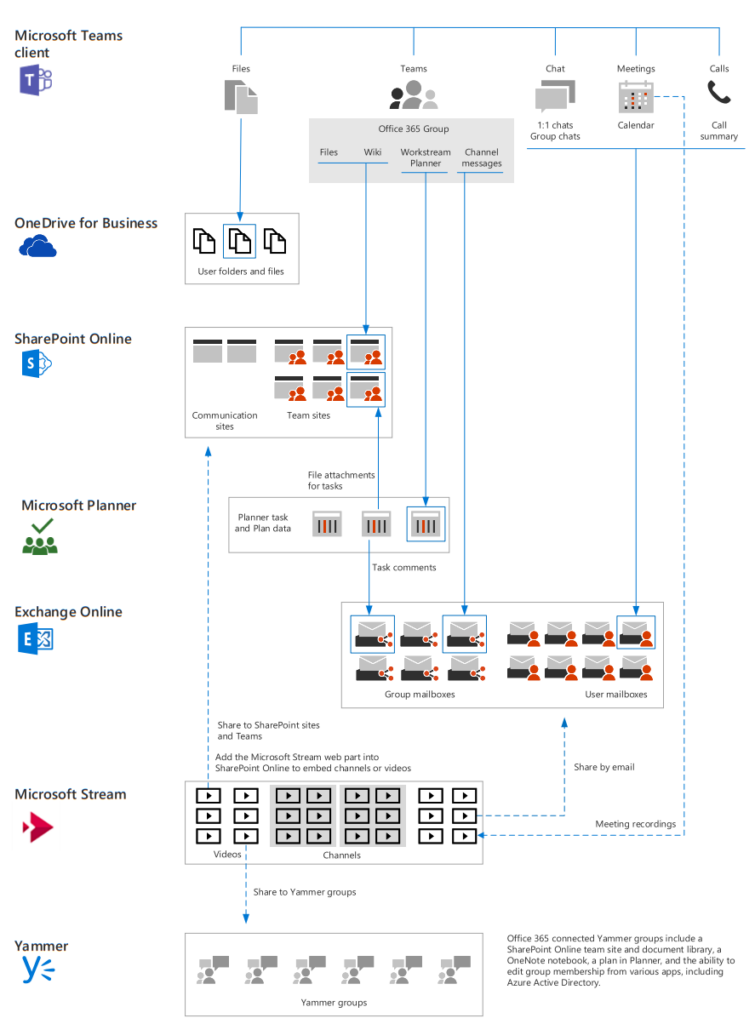
I’m using this page taken from the service relationship structure of Teams to show you how all the services are interconnected to create a fully fledged collaboration solution. Microsoft has been doing this for a while now, where they take existing Azure resources and combining them into new services. Take for instance the Data factory resource, which is really the combination of an SQL database, compute resources, a managed network and a service bus to provide buffer services between the resources themselves. This would not be difficult to set up yourself, but the unified process and web portal for management makes it a much better service.
Teams is the same. I’ll break down the image above just for reference:
Teams consist of:
Files -> Shared between users over chat are stored in OneDrive (Microsoft Teams Chat Files)

Chat -> Stored in the Exchange Online user mailboxes and uses Azure Cosmos DB storage on the back-end to allow for “unlimited scalability”.
Meetings -> Uses your Exchange Online calendar functionality to construct a calendar overview Microsoft Teams can read. This means if the user has a license without Exchange Online, the Teams client will not provide a calendar application on the left side.
Workstreams & task boards -> Workstreams and task boards are very carefully constructed SharePoint Lists and Planner functionality. The idea is to be able to provide highly customizable lists for users.
Calls -> Uses the old SIP telephone system and possibly the Public Switch Telephone Network (PSTN) which runs the digital phone system we use every day. There are two systems running side by side, depending on what functionality you’ve set up for your Teams instance.
When you’re setting up a domain in Microsoft 365, you’re asked to add this DNS records to make the calling function work:

The reason for these records are to allow other systems call in to your Teams (using Skype For Business, who again uses old Lync.com call-structures) instance and provide you with a secure external lookup. If your company use the PTSN integration, you have two solutions in there as well:

I’m not going to cover option 3, as the third option covers Skype for Business servers. I simply know way to little about them to provide any valuable input for you. I’ve drawn up the structure for you in the currently available options, SFB server not withstanding.
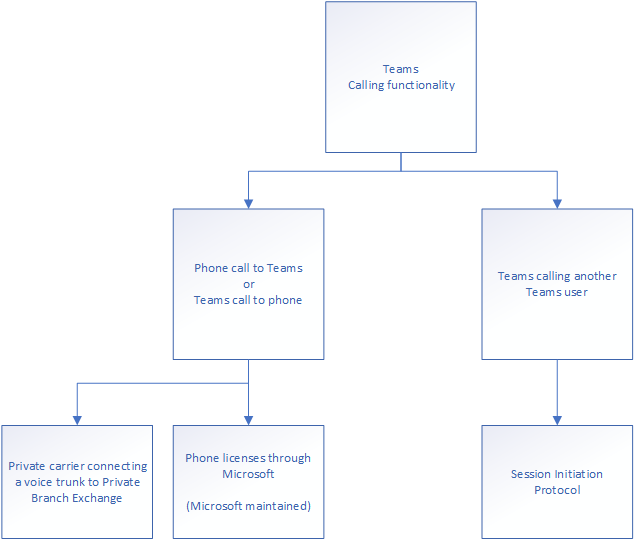
In Norway your carrier will supply the PBX functionality on their end, meaning you as the administrator does not need to add any hardware to your datacenter or office. However, this may be subject to change in your region if you’re not in the Norwegian market. If you’re one of the lucky ones who operate in a market where Microsoft provide PTSN routing through licenses – Congratulations. All of the hassle with private carriers can be entirely disregarded. A license is then all you need, and the users will have an external route for phone calls within 24 hours (Everything takes 24 hours in Teams).
Calls are however not stored anywhere. The metrics of a call, be it Teams to Teams, meetings, channel meetings or through the PTSN are stored in what Microsoft calls the CQD (Call Quality Dashboard) which is an Azure Log Analytic Workspace metric structure on the backend.
Meetings can however be recorded and stored. This functionality is performed by Microsoft Stream and allows for a type of YouTube stream-ability for your corporate meetings and courses. On the back-end, the functionality is delivered through mp4 blob storage hosting and a web front-end for manageability.
The point of this part of the article was to show one of the processes ongoing in Microsoft these days: Taking core functionality found in the Microsoft Office and Azure environments and combining them to create new services for customer consumption. Teams is a wonderful result of this process, where they combined all of the Azure resources and MS Office services listed above to create the application. But we’re talking about sharing…
SharePoint
Is the obvious platform to start with as it works as the MS Office “file” and “intranet” servers (even if they are so much more than just a file and intranet server). Often, we’ve seen customers mistake the SharePoint service for an archive, putting everything they’ve ever owned in one Document library. Let me show you:
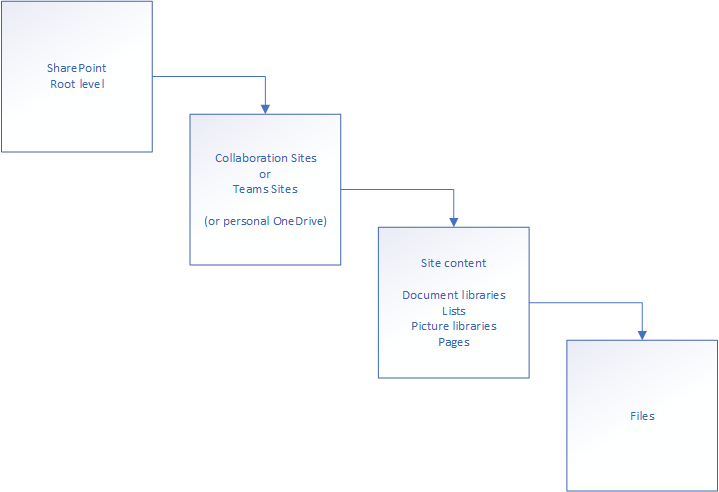
Putting everything in one Document Library is a poor decision as it makes it extremely difficult to manage privilege assignments, in addition to making it difficult to list files. There is both a max file list size and path depth before things start to go terribly awry. The max file list before list views start failing is 5000 files and bigger – then you have to be creative with how you deal with them. And the max character path depth is 256. Deeper than this, and the files may start to get corrupted. I usually tell customers never to go deeper than 4 levels. If they need more than this, consider moving to a new Document Library.
Note too; SharePoint is built on “Sites”. These are webpages, with content in them – allowing you to make beautiful intranet sites, as well as being file-servers. The file-server portion of SharePoint is called Document Libraries, and are part of the “Site Content”. Site Content can be Document Libraries, different pages, applications, lists and so on.
Sharing is one of the most important parts of SharePoint. As I’ve written several times already, Microsoft expects you to turn off everything you don’t want or need. This means you as the administrator need to be incredibly mindful of how you’re configuring SharePoint when you’re starting off. SharePoint is entirely open when you spin up a new tenant: The default sharing policy is to allow everything to be shared and everyone to share. We’ll get into how to secure it further down in the article.
OneDrive and sharing
OneDrive is a personal SharePoint page with a default Document Library attached. I’ve drawn the logic here:
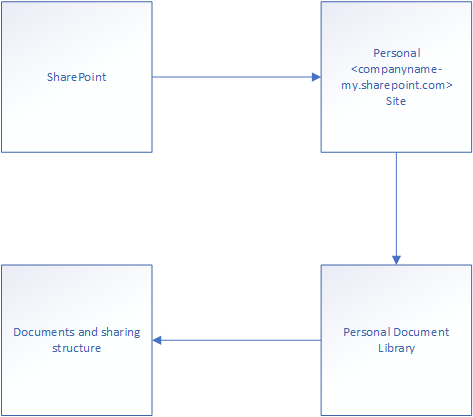
The document library conforms to the settings found in the SharePoint administrator panel, allowing an administrator to configure the allowed sharing levels, which can not be higher than SharePoint’s own sharing configuration:

This is the configuration I would hope most of my customers have, as it conforms to best practices. The idea is the OneDrive sharing functionality can be restricted as lower than the SharePoint baseline, but it can never be more permissive than SharePoint Baseline. To illustrate:


There are further administrative options here I will explore, but it will be in the “SharePoint – Sharing Configuration” part of this article, as it’s more connected to the platform as a whole, not the individual services.
OneDrive can be further restricted using the following options in the SharePoint administrator panel options:

The options are simple:
Notifications: Turn on or off the “You’re deleting a lot of files right now” message you get when you’re cleaning out.
Retention: For how long do you want to keep the personal recycle bin. This is only for the first-stage recycle bin, not second stage.
Storage limit: Would you like to limit the storage provided to each of your users? If so, change it here.
Sync: This is where the fun begins. In this set of controls, you can change if you want users to be able to press the sync button in their OneDrive, if you want to hinder computers not in your AD Domain to sync from OneDrive or activate an extension filter, refusing to sync files of a certain file extension.

I’ll post the list of extensions I commonly dump into this filter down below. When using the “allow syncing only on computers joined to specific domains” functionality, be very careful. If users are currently syncing files form OneDrive to private computers, you will not remove the files by flipping this trigger. You’ll just stop syncing, leaving a lot of orphaned files laying around. The best way to fix this is to activate and enforce sensitivity labels until you’re comfortable, then flip the switch. This would allow you to hinder data loss where users who quit the company still have data stored on their personal devices and access to them. Endpoint Data Loss Prevention isn’t really an option here, as the computers are private. You can however activate standard Data Loss Prevention to stop users from sending internal-labeled files over their work email.
On the user side of things you can find the following options:

These are notification options which are much more comprehensive than the administrator panel. Users can themselves change what and why they’re notified of by the service by toggling these breakers. On the right hand side you’ll find the “More Settings” link, leading you to this page:

Here you’ll be able to find several more options.
Access requests and invitations: This is the page where other users are trying to use a link not designated for them. This grants them the “request access to this resource”. The management of this function is identical to the SharePoint one, where you’ll get the following page:

The page lists pending access requests and the approval history. You may approve or decline access requests, and it will be written to the History.
Site Collection Administrators: Allows you to grant other users administrative privileges on your OneDrive page. This is akin to a delegated full access on a shared mailbox in Exchange, where the user may open your OneDrive page is if it was a standard collaboration site. The page it opens looks like this:

Manage Guest Expiration: Is a function of the identity management, where guest identities who have been provided access can have their access expire. The link here will open a fly-out allowing you to extend the access if need be.
Run sharing report: Is used to create reports on what files are shared from your OneDrive. They may take some time to generate based on how many files and users you’ve shared to. The csv looks somewhat like this:

With list of who and what privileges are used in the sharing process. You’ll have to designate a place to store the report, as it is dumped to your OneDrive.
Site collection Features: This option collection contains a lot of functionality used to configure advanced functionality for your personal SharePoint site. The page looks like this:
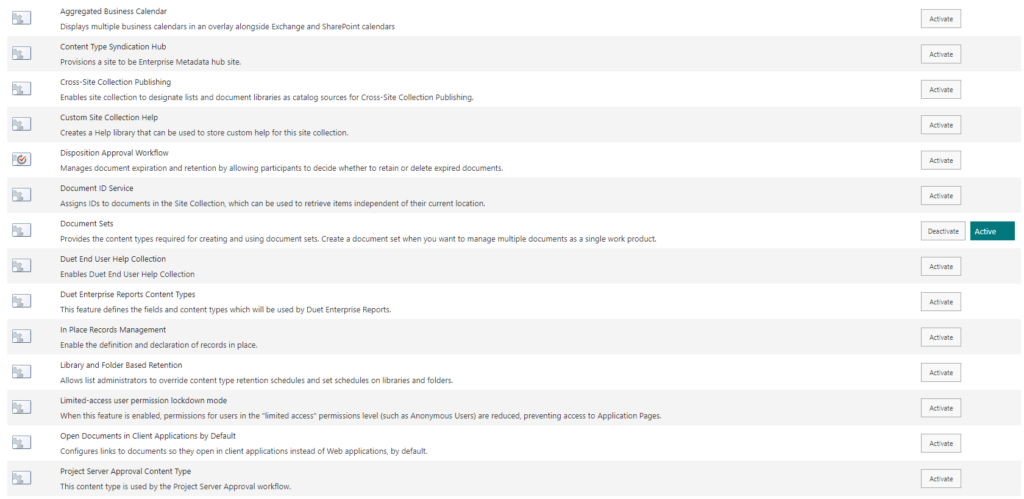
I’m not going to go through all the different options found on this page, but it allow you to configure anything from SharePoint Server integration, Calendar integration, review structures or something as simple as site retention configuration.
Storage Metrics: Is used to provide you with an overview of what parts of the SharePoint site taking up space. You can drill down further by opening a link, providing you with a more granular view.
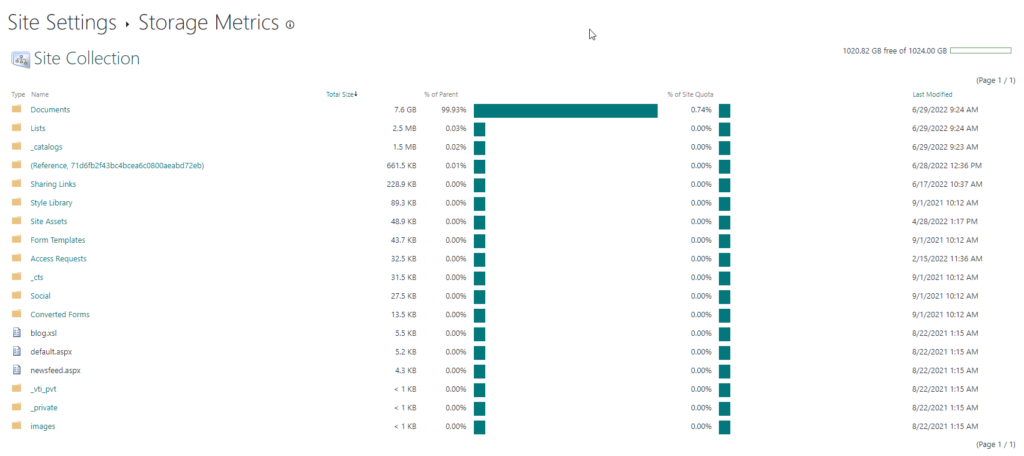
This is my SharePoint site, with no view of my personal files.
Return to old Site settings page: This option allow you to open the old structure, providing you with the same options you would find on a SharePoint server. It looks like this:

How does sharing work in OneDrive?
On the client level you have two ways of sharing files. These will be identical in Teams and SharePoint services as well as OneDrive. First one out is through the OneDrive client:

This will open the “Sharing” dialogue, allowing you several things. If you’re using Windows 10, you won’t have to go through the menu-in-menu solution 11 loves so much. The dialogue looks like this:

When you’re in the dialog you’ll be able to choose what users you want to share with and what the message will say, what privileges they should have and do administrative tasks. Here’s a filled out one for reference:

But maybe I don’t want Veronica to make changes to my document. Maybe I don’t even want her to be able to download the document? By pressing the link saying “People you specify can edit” – You’ll get the following dialogue:

Here you see the field “Anyone with the link” is grayed out. This means the administrator has disallowed the creation of links where the link is viewed as an access token. I’ve drawn the logic here:
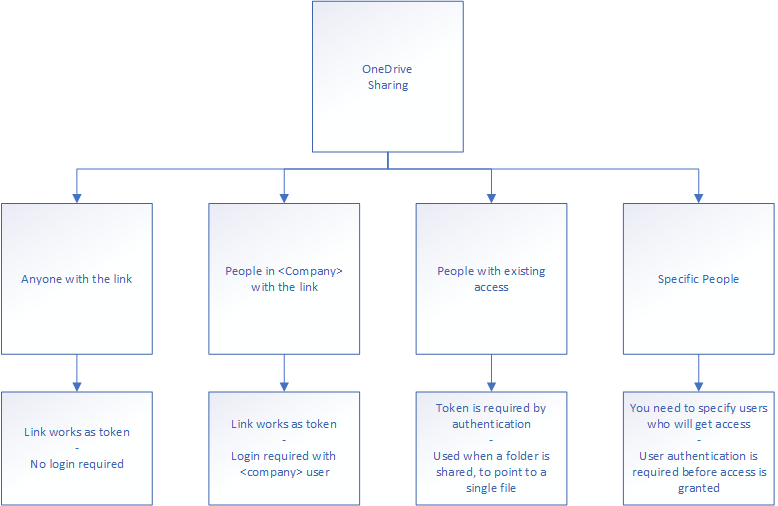
Restricting access to write privileges can be done even more extensively in Office files (.docx, .xlsx, .pptx and so on), allowing restriction of write, download and force review mode.

Sharing this file with myself, I get these settings:

Pressing apply will provide you with a shareable link. To test the link, I’ve thrown it into a private browser window. You’ll be met with the following fields:

Adding my personal email address to this field will send a verification code to it which I need to provide in order to gain access. The email looks like this:

Adding them to the authentication part of the OneDrive sharing process:

Performing this authentication grants me the reviewer screen, which is a very limited word web-application, without print or download privileges:

Returning to the sharing dialogue you’ll see the following faces have showed up in the bottom of the dialogue:

Pressing either of these pictures provides you with the sharing administrator dialogue:

Here you can change who is allowed access using the different links, and remove them if need be. An object can have several different links associated with it, providing different access levels. And a user can have several different access levels based on the different links it’s associated with. Here’s my test link for reference:

The link settings can not be changed when they’re put on restrictive mode. You would have to create a new, less restrictive access link to provide more privileges to a user. However, if I wanted to add users to this access link, I could do so by adding them to the bottom, where it states “This link works for”. I’ve drawn the logic for you:
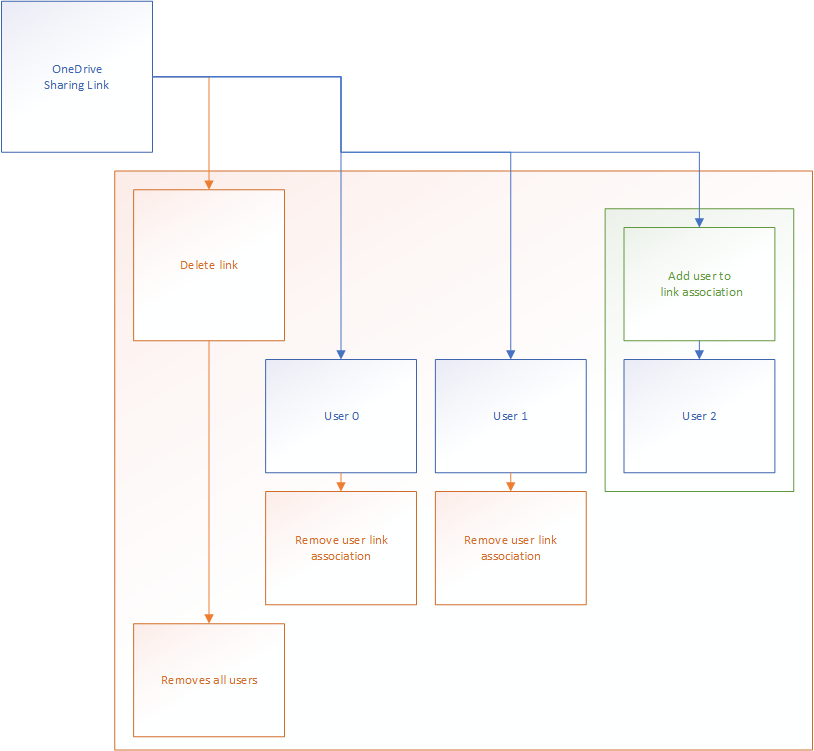
A short explanation: When you remove a link, all the users associated with the link lose access to the object, however, you can both add and remove the users from the link in order to provide or remove access to it. When you try to delete a link you’ll get this message:

Pressing “Delete link” will provide you with the following window:

Showing no link is providing access to the file, and your own user is the owner of the document. When you’re using this dialogue structure in Teams, you’ll be able to list out the privileges provided to the object using this dialogue, providing you a list of users with member, guest and owner privileges.
The second way of sharing in OneDrive is to press the following button on the ribbon in the web version:

You’ll see this button in SharePoint, Teams and OneDrive, and they all trigger the same dialogue. Pressing the button looks like this in the web version:

The functionality is exactly the same as the Desktop application version.
Teams
First of all, we need to define the privilege levels for Team sites and the application itself. The structure is different from the old SharePoint system, where you’d define your own groups – Teams streamlines the process by automatically creating three different groups:
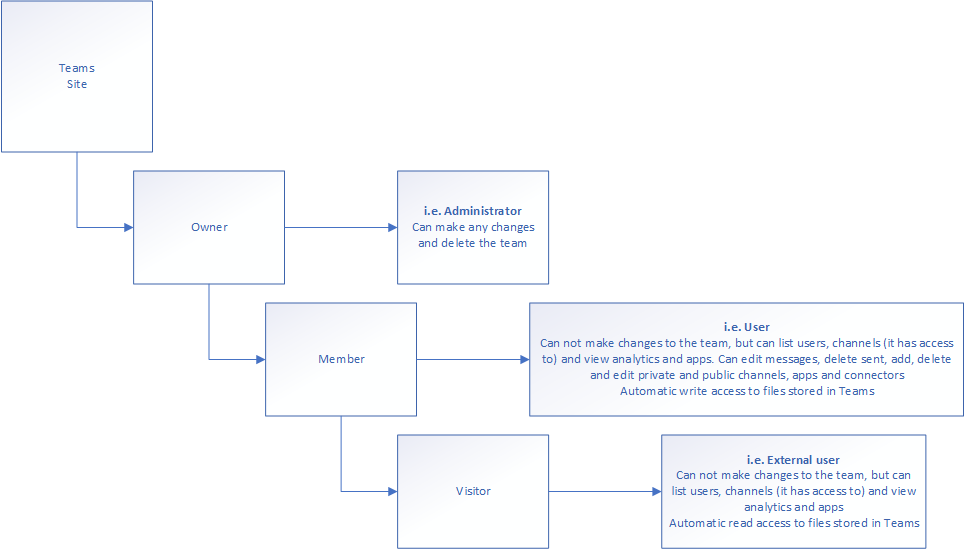
Owner – i.e. Administrator:
Can make any changes and delete the team. Has automatically full control of every aspect of the Team and the underpinning SharePoint site.
Member – i.e. User:
Can not make any changes to the Team itself, but can list users, channels it has been provided access to and view analytics, apps and tags assigned to the Team. The member will be able to edit messages, delete sent, add delete and edit private and public channels, apps and connectors. The user is automatically assigned to a SharePoint group called <Team name>-Members, which is assigned read/write privileges to files stored in the Team SharePoint site.
Visitor – i.e. External User:
Identical to Member privileges in the Teams app itself, but is assigned to a SharePoint group called <Team name>-Visitors, which is assigned read privileges to all files stored in the Team SharePoint site. It can not add, edit or delete channels, apps or connectors, neither can it edit messages other than their own.
Teams is structured through two different functions: Private and public teams, with private and public channels contained therein. The most common is private teams in modern enterprises.
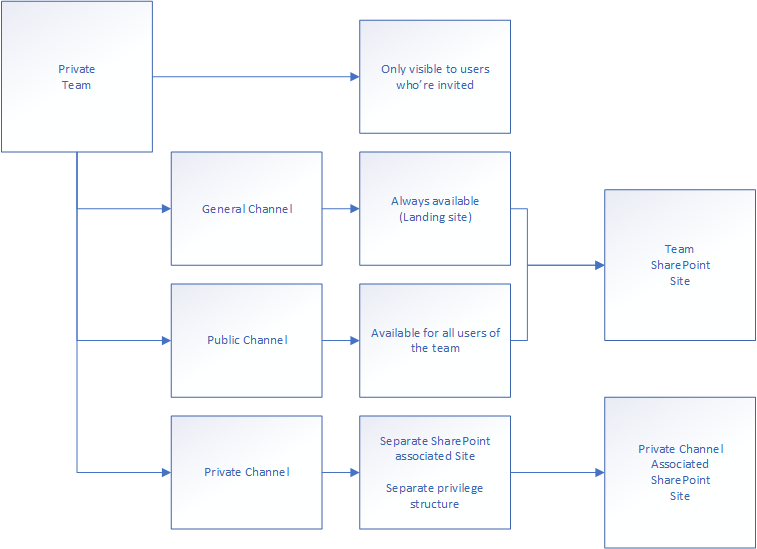
The major difference between the public and private Teams is the invitation process. Public Teams allow users in the organization to delegate access to themselves without going through an approval process. Private Teams have an approval process, where users in the owners group need to invite users to the Team to allow access. Optionally can this be changed by owners of a team to allow users of the “Members” group to invite to the Team. This can however not be assigned to members of the “Visitors” group.
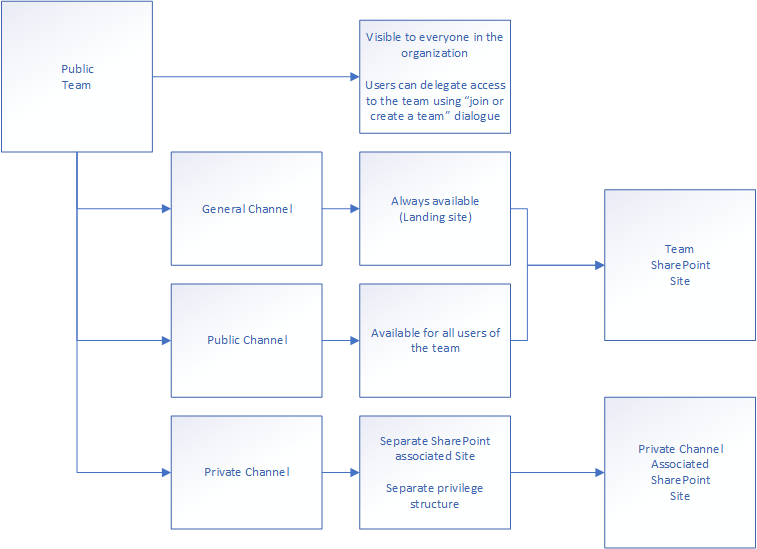
The idea of “Private channels” came around as users posted proprietary information to the common channels with guest users in them. With private channels, you allow internal communication to happen in the same team without having to show guest users the information. The old way to deal with this issue was to have both an external and internal team for the same project. This is still common in a lot of organizations (a hand-me-down from corona times), but entirely unnecessary unless the internal team need to add internal tools to the team.
Teams sharing works identically as OneDrive, but there’s another layer to it, where users can be provided access using the sharing function in SharePoint document libraries. In any Teams site document library you’ll find the following sharing information:

The list uses the same privilege levels as I noted above:
Owner
Member
Visitor
And you can note the pen mark, allowing you to see who has write access and who doesn’t. This can however be changed by the owner of a file or by the owner of the SharePoint site. The third option is to change the privileges to “stop sharing” – performed like this:

When you stop sharing like this it can become difficult to share the file or directory using the auto-populated groups again, but you can always reactivate inheritance, allowing you to automatically re-populate the privileges table. However, if you’re doing these kinds of things in a Team, please use private channels inside of the team instead, as it allows much simpler privilege control and file management.
SharePoint – Sharing configuration
SharePoint can run several restrictions and allowances when it comes to sharing for the entire storage and hosting platform. The first one is using policies like I showed you above:

This option allows you to make changes to what you allow and disallow for the entire platform. If you require more granular privilege control, you’ll need to allow all, and change the permissions for each SharePoint site as they are created. You can do this by visiting the active Site and press the “policies” page:

Changing the “External Sharing” setting, you can restrict the sharing functionality for this page in particular. The options here are:
External Sharing: Allows you to set any of the available sharing policies directly to the Site. Note: The only policies available here will be the ones you’ve allowed for the service itself.
Advanced Setting for External Sharing: Allows you to limit sharing by the domain the user is logged in with. This means you can in theory build something like this:
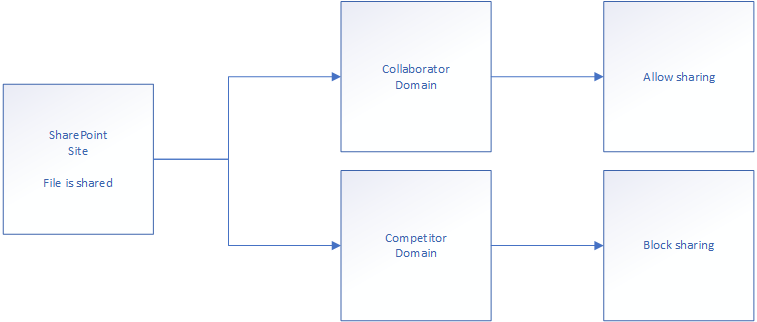
The system is based on an allow-list, meaning domains are either included or soft-denied. In clear text, it means whatever you allow on the list goes through, everything else is denied.
Expiration of guest access: This one is pretty self explanatory. When guest users are added to the SharePoint Site, you can have their access automatically expire in a given amount of days. Below is a solution where the site requires expiration within 3 months.

Default sharing type: Determines what the standard sharing link is configured to be.

This means you can refuse users to “mindlessly” overshare files and folders by just clicking next, next, next, finish. In the situation where you have “Anyone with the link”, you can chose to have that link expire after a certain amount of days. This will prevent the link from being mined out and found by malicious actors, by enforcing time-out after a short period of time, like two or three days.
Default link permission: Determines the standard permission for the links created; either view or edit permissions. Again, this only prevents oversharing by users who press next, next, next, finish – forcing them to mind their choices.
Note: All of these settings can be made on the SharePoint service level too, but I would be very careful making blanket changes for the entire service.
On the service level you have these last options to activate:

These are not strictly sharing options, but allows for greater sharing visibility for shared documents. If you’ve ever shared a document in OneDrive and received the email “<User> successfully accessed <Shared Document>” – these are the same options.
Lastly, you’ll find Access Control under the SharePoint service policies. These define policy settings for both OneDrive and SharePoint. These allow the configuration of:

Unmanaged Devices: Defines if privately owned devices can access SharePoint and OneDrive functionality. This activates a conditional access policy I’ve detailed in my post “Conditional Inaccessibility“, preventing devices not under corporate control either through azure registration, hybrid or joined to access the service. This means your personal computer at home will not be allowed to access the SharePoint or OneDrive services unless you allow the company to control it.
Idle session sign out: Defines how often the OneDrive or SharePoint session needs to be reauthenticated. If you have users who are useless at logging out of shared or public computers, this could be a smart thing to configure, but you would rather use session persistence controls in Conditional Access to control for these issues.
Network location: Allows you to define what IP addresses you can access the services from. This is an allow-list again, meaning the moment you’ve configured an IP address, you’re effectively soft-denying everything else. This means you always need to keep your IP address in there. This is often configured in specific situations like HIPAA or PCI DSS compliancy is important.
Apps that don’t use modern authentication: Allows you to refuse non-modern application access to SharePoint and OneDrive services. If you have computers running Groove or older versions of office (2016 and below) this option will allow you to lock them out of the service. It activates a conditional access policy automatically, allowing you to customize it from there.
Securing SharePoint, Teams and groups using Sensitivity labels
Sensitivity labels allows administrators and compliance officers to define what kind of controls a document is supposed to have and embed the configuration directly into the document itself. Normally when we’re securing document in a classic on-premises configuration, we’re securing the storage location of the sensitive documents, not necessarily the documents themselves. This usually means you have a folder in a shared area with different privileges than the rest. Commonly HR, Finance and Admin folders. You can read more about how to protect these properly in my post “The ADvice Nobody Takes“. Using Sensitivity labels, you assign a privilege directly to the file itself, and then it doesn’t matter where the file is for the privileges to take effect. I’ve drawn up a mind-map for the different compliance functions in Microsoft:
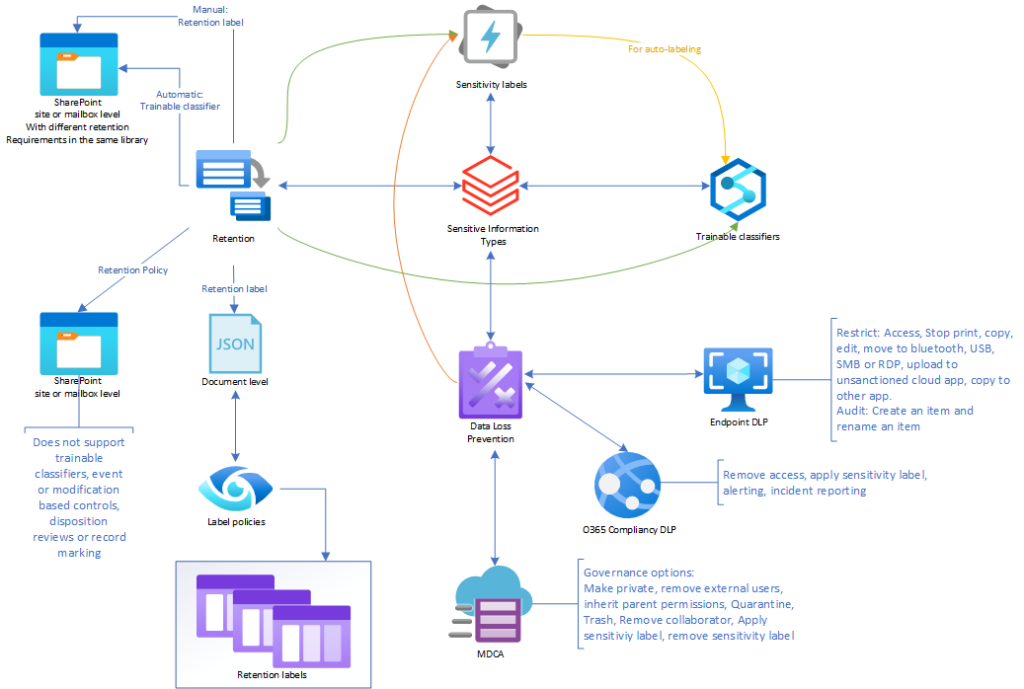
I know, I know, this looks really difficult, but we’ll de-mystify it. Here’s a setup I created in a “Proof Of Concept” for a customer not long ago:

You’ll see it defines a type of sensitivity and scope. Users know what kind of documentation they’re creating, and from there they can assign it a configuration. Take for instance a file describing salary information. This will easily go in Confidential\HR. A document you’re writing for your local football club not connected to work, can easily be labeled “Non-Business”. Simple, right?
Below the surface, you’re using Azure AD to provide privileges based on the label itself. When you’re marking the document with “Confidential\HR”, the original author keeps the privileges, but assigns co-author privileges to everyone in the HR group. Everyone else are rejected. If they try to open it, they’ll have to log in with MFA (defined in Conditional Access) to gain access to the document. The same system can be used to configure privileges and access to all documents and information found in both Teams and SharePoint Sites. In SharePoint, you’ll find this option in the Active Sites\<Site>\Policies:

Here you’ll see “Sensitivity”, defining what sensitivity label is attached to the site itself. Sensitivity labels assigned to Groups and SharePoint Sites are used to control the following functions:
Privacy: Public or Private of Teams sites and Microsoft 365 Groups
External user access: Are external users allowed in the Team or Group?
External Sharing form SharePoint Sites: Are you allowed to share documents from this area?
Access from unmanaged devices: Are you allowed to use non-company devices to access this area?
Authentication context: Allows the administrator to take control of the allowed contexts, and control how rules are enforced.
Default sharing link for SharePoint Site: What link privilege should be presented by default?
Site Sharing settings: Are you allowed to share files internally from this area?
It is of cause possible to use the same labels for both file, email and groups, but it’s not advisable as it reduces functionality – I’ll talk more about that below.
In addition, you’ll need to do some extra configuration steps before group support is enabled. Read the following docs to provide this functionality. I’ll write a compliancy structure article at a later date providing a full work-through.
Securing using Microsoft Defender for Cloud Apps Governance functions
Microsoft Defender for Cloud Apps is a wonderful solution for controlling sharing beyond what is natively available security wise in applications. MDCA is a reverse proxy between your users and their applications, allowing policies to govern actions taken both on the company controlled applications and outside them. This means the system can control sharing of corporate files between all services it controls for company devices. Microsoft has drawn the system quite nicely like this:

Creating a file-policy is structured like this:

This means you can check several signals through the proxy service. The structure rely on some standard trainable classifiers (AI) models to look for Personally Identifiable Information (PII), Payment Card Information (PCI), Source Code or Protected Health Information (PHI). Otherwise you can look for other signals, like files with emails (regex), digital certificates (regex) or stale externally shared files (access logs).
With these signals you can configure the service to make certain changes. We’ll look at the simplest one of these: “Stale externally shared files”
The system looks for any file with access level, and last modified more than 180 days ago.

From here it can perform one or more of what the service calls “Governance options”. Governance options takes control over the file’s sharing and privilege levels and changes them to what you’ve configured. OneDrive allows the following governance options:

My personal favorite is to apply sensitivity label and make the file private. This in conjunction with Data Loss Prevention would prevent the use of the file outside the company. If Sensitivity labels aren’t configured, making the file private and notifying compliance officers could be a good substitute. SharePoint is rather similar:

You can use the service to “bug” the user to remove the sharing to make the user accountable for their own sharing, or just tell them and force the file private as a “name and shame”. The system is extensible, allowing you to create governance policies matching your business continuity requirements.
I will at a later date go into all the fun things you can do with Microsoft Defender for Cloud Applications, as it really is an amazing solution to protect your data from leakage and users in “people’s roads” (read: taking shortcuts).
Securing using Microsoft Compliance Data-Loss Prevention policies
Sharing documents happen all the time in modern enterprises. Using sensitivity labels and/or Data Loss Prevention policies, you can create policies controlling what files and when you’re allowed to share. Microsoft Compliance Data Loss Prevention policies (MSC DLP) uses signals like:
Sensitivity label assigned
Sensitive information types included
File extension
Pattern matching for special types
Template fingerprinting
Specific document properties
Form there you can create an action, like stopping the sharing process from completing + a notification structure. This would allow the administrator to configure the service to both stop the data loss and send an incident report to the compliance officer for further follow-up. If you’re a nice administrator, you can provide the user with tool-tips, explaining them they’re on the road to share sensitive information with external users. Here’s an example of an action:

And a user notification:

My most common use of Data Loss Prevention is this one:
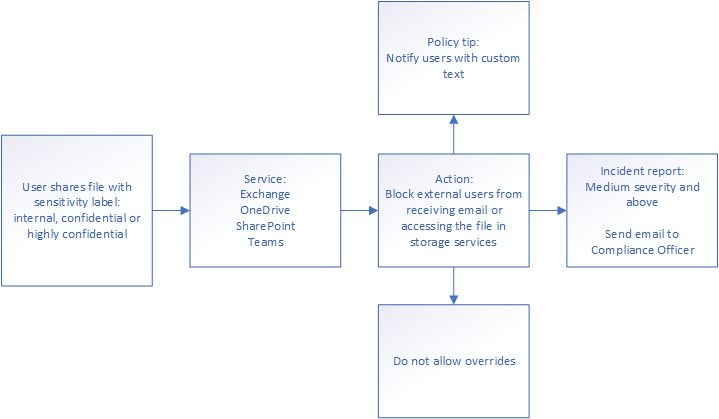
Please note this is not just one policy – this is several policies. You will want to have separate policies for different platforms, as you loose out on configuration options the more sources you add. The reason for this is because the signals must match on the back-end for the DLP engine to handle them under the same rule. However, they rarely do, and it means the system reduces configuration options to allow them to match.
On corporate spies
We are naïve in Norway. The Norwegian newspaper “Dagens Næringsliv”, loosely translated to “corporate life today” wrote an article in 2017 saying around 90% of employees bring with them documents from their old job when they start new engagements. We believe corporate spying and information leakage between competitors are not a thing here. We’re wrong.
One of the first things you can do when it comes to facing this challenge is to restrict where guest users can be invited from and who can invite them. You’ll find this setting in Azure AD, under User Settings\External Collaboration Settings. Here the options are:

You can choose to configure it using a allow or deny list. Deny lists deny only the listed domains and the allow list allows only the explicitly allowed domains. This means the domains not configured in the allow list is automatically soft-denied. Who can invite guest can be restricted using the settings in the same panel:

Best practices here is to only allow users with the “guest inviter” role to invite guests to the tenant and perform regular guest user access reviews to get them out of then tenant again when they are no longer necessary.
Second solution is to use Insider Risk policies to perform auditing of Data theft, Data leaks or Security Policy violations. The idea is to use User Entity Behavior Analysis functionality to look for outliers in departing or regular users. These kinds of policies react to:
Downloading of files from SharePoint
Printing files
Copying data to personal Cloud Storage services
An example of a template looks like this:

SharePoint site design for customer solutions
SharePoint can be configured to use different architectures, supporting different business configurations and requirements. I’ve drawn some of them because it’s important to be able to distinguish them and their business impacts.
Hub-and-spoke
One of the most commonly seen configurations, as it allows the corporate intranet site to be the “ruling” center of the collection and the other special interest sites to be connected to it. This allows for news sharing form the center site over to the others, and a seamless navigation between the pages.
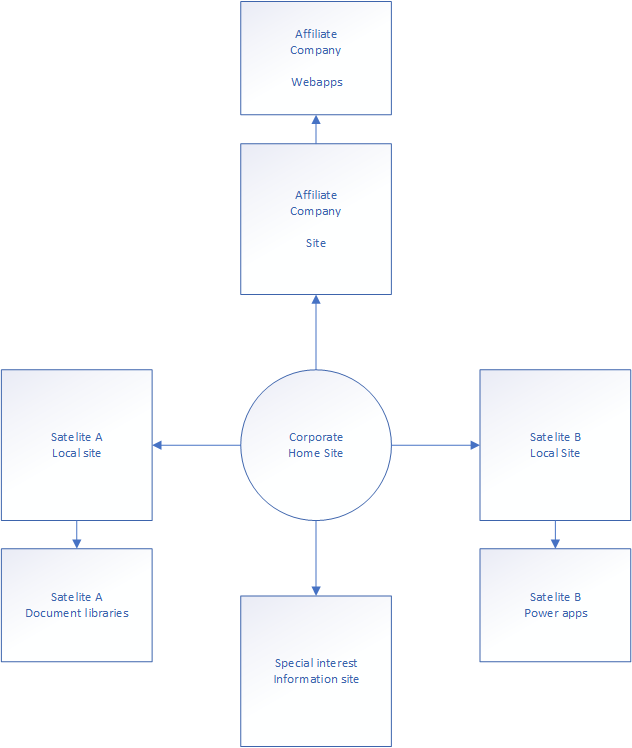
Configuring privileges for these pages isn’t difficult, but you need to be careful not to allow more than the users need. Creating privileged groups for each of the pages, and using Azure AD to evaluate the groups membership is usually the best way forward. Using Sensitivity Labels to configure the required settings like sharing policies and external access is a good idea.
A use case for this configuration is a company who purchases other companies or holding companies. This way you could have a central news-site (intranet) and purchased companies and their sites structured around them. The users will see them in the hub navigation menu, but not get access to sensitive document libraries for instance.
Subject configuration
This configuration is structured as a silo. If there are several companies in a single tenant, with little to no overlap, configuring this way would allow you to configure tightly held privileges removing access from users who don’t need the information stored within them.
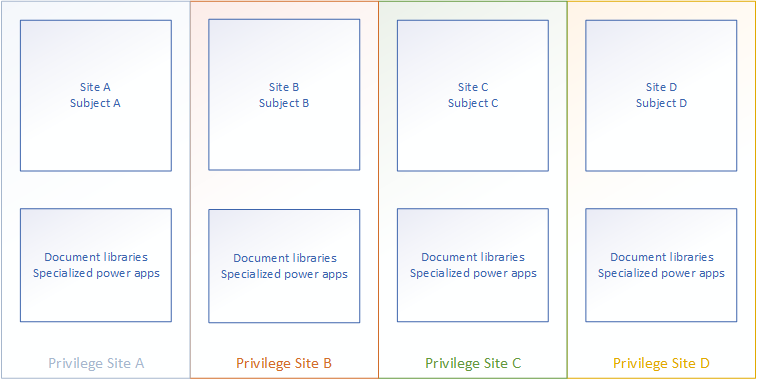
An example use case for this configuration could be an investment firm who have very specific users allocated to different projects, where there is little to no overlap between them. This would make it simple to configure sharing policies and keep control over how information flows both internally and externally. If you add a guest user to this solution, you’ll provide them with explicit access to the necessary group, and nothing else. Each Site will have to be accessed directly, and privilege is evaluated for each step the user takes.
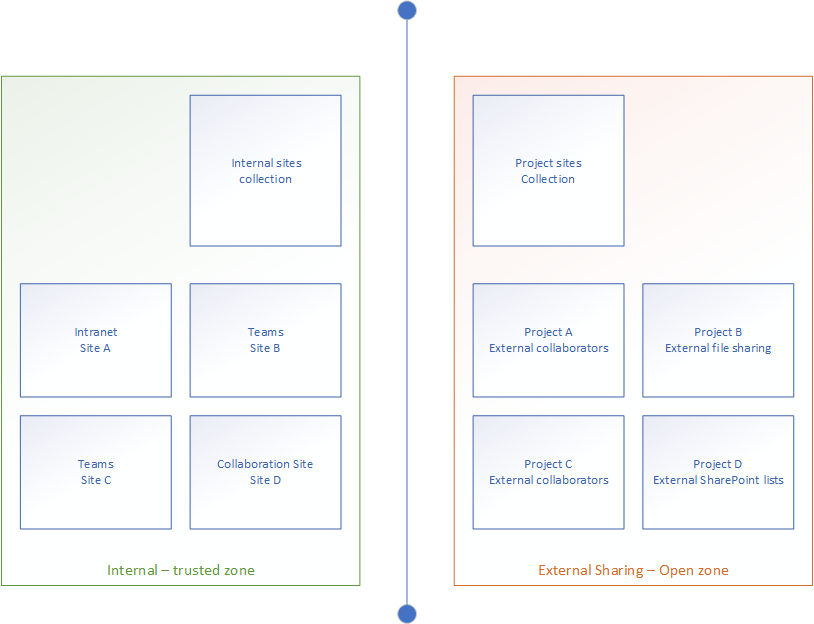
Secure and open zones
This is a common solution for companies who want to keep a very explicit distance between the internal and external areas. This is a great way to make it very obvious where you can and can not share files. Often I’ve found companies to have a single site with several document libraries and guest access and link expiry configured. This makes it simple to keep track of what goes where, but activity log retention is paramount in these configurations. However, making group based Sensitivity Labels for these configurations are super simple, as you just need two of them: Internal and External
Thank you for reading