Privileged Identity Management and why it’s the best solution to the third party administrator requirements available today.
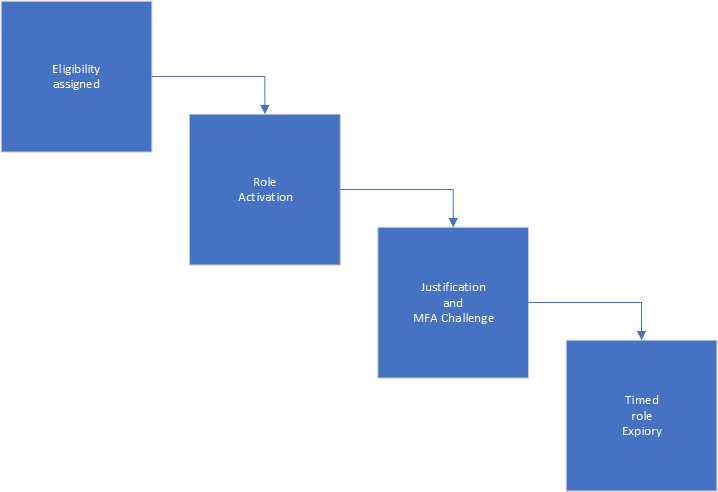
Privileged Identity Management is a identity governance functionality in Microsoft 365, allowing administrators to define eligibility for different roles, and attaching conditions to their activation. Let me explain:

The administrator will start by assigning either a user or a group (group being best practice) eligibility. This doesn’t mean the user will get the role activated immediately, but will allow the user to request activation. Looking at the administrator panel for the PIM service, you’ll see something like this:

Starting from the left, you’ll see both Exchange Administrator and User Administrator have eligible assignments, through the groups PIM Superuser Exchange Admin eligibility and PIM Superusers user administrator eligibility, respectively. By using groups like this, you’re making it much easier to get an overview of who you’re allowing eligibility to. In addition, you’re allowing access reviews, as you can’t run access reviews on eligibility, but you can on a group level. If you’ve followed best practice, your groups should look somewhat like this:

Activation
My user is currently in the User administrator eligibility group. In this part of the article I’ll take you through activation from start to finish. I start by writing in: aka.ms/pim in my browser window. You could certainly create a cname record (canonical name – view it simply as a redirect) to this link, but Microsoft has already done it and users should be accustomed to the aka.ms/mfasetup already, making the PIM extension simple to train users in. However, many companies like having PIM.companyname.com as their forwarder, and I understand it looks better for users. Visiting the aka.ms/pim link you’ll get an overview of the roles you’re eligible for.

Remember you can open the pictures in a new tab by right-clicking on them and choosing the top option. WordPress doesn’t work all that well when it comes to image compression in the articles. And to be entirely honest, I’m not going to make this blog into a nightmare to maintain by adding functions like a zoom in java function. Here’s a closer view:

The first thing to notice is what administrative role you’ve been assigned eligibility to. You should never provide people with more privileges than they need to get their job done. I love the “Principle of least privilege” even if it’s really difficult to maintain in the modern workplace. As I need to be able to make changes on collaboration settings and user roles, I need the User Administrator role. If you have a user who sometimes need access to reset passwords and assign licenses – don’t give them User Administrators role; they don’t need it. They’ll be absolutely fine with the Helpdesk administrator role. Microsoft made a great article here providing an overview of the available roles in Microsoft 365.
The next part is the Scope. Imagine you have a sprawling, world-wide company with several IT departments in different countries. You don’t want the office in New York to make changes to the users in Bangladesh, and vise versa? This is why you can use administrative units to define clusters of users who are bound to one unit. This would allow the head office in Amsterdam to create groups for both the New York and Bangladesh office, allowing them access to make changes only to users assigned to their respective cluster. If you haven’t defined these administrative units, you’ll use “Scope: Directory” as it means all users and all computers in the tenant. The word directory is from Active Directory, meaning a network (of users, groups, computers and servers) that’s always changing.
Membership allows you to easily figure out if you personally have been assigned the new privileges, or if you’ve been granted the privileges through a group. In the picture above, you’ll see I’ve been provided through a group. I’ll go through access reviews later in this article, as it’s important to keep track if the eligibility is still needed. Further on the right, you’ll see these two:

End time defines how long your eligibility is available. Imagine you have a third party software supplier who need to change an enterprise application in Azure Active Directory. You don’t want to allow the third party user permanent access, and you shouldn’t allow them a higher privilege than necessary. You’d want to allow them a week of eligibility and justification for the cloud application administrator role. I’ll show you how to configure timed eligibility further down.
Action is simply the link to activate the role. Pressing the button will provide you with the following “fly-out”.

As the User Administrator is a precious role with a lot of privileges, I’ve refused the active duration time to exceed five hours. The company I’m collecting these images from doesn’t use approvers, as they’re just looking for tracking and information gathering. I’ll show you how the approver function works further into the article. Before sending the request to Azure AD, I add the following justification:

Pressing “Activate” role will start the activation process. I’ll show you how it looks when you’re activating a role in a system with a verification process further down. Step 1 is to processing the request and activating:

When the activation process is completed:

The system will then move you to “Active assignments”, where you’ll see the state go to “Activated”. In this directory, I’m a Global Administrator, which is a permanently assigned role (on my user), and now I’ve activated the User Administrator role in addition. See the difference in “State” between: Activated and Assigned.

In solutions where the organization has validation structures, you’ll get the following window trying to activate a role:

This is because PIM is forcing the user to authenticate using Azure MFA before the request can be made.

After authenticating you’ll be allowed to make the request as noted above, but you’ll have to wait for the approval to go through:

On the administrator (approver) side, they’ll receive the following email:

I’ve blanked out the organization name and the reason provided as they contain sensitive information. When accessing the link, you’re provided the following window:

The page will provide you with the role requested, who requested the role, request time, what resource (removed for privacy reasons), resource type, reason, ticket number, ticket system, start and end time. This organization doesn’t use a ticket system, making the fields unnecessary, but can easily be implemented. I’ll show how later in the article. Marking and pressing “approve” on the request displays this flyout:

Justification is going to be logged in the activity log for further transparency and compliancy. Writing the following and pressing confirm:

After a few minutes in my administrator account:

I’m not going to keep the access as it’s just a test. After the activation is confirmed, administrators are provided the following email as a notification:

Deactivating the privilege is simple, and can be performed by pressing the following button in the PIM overview:

Pressing the button will provide you with the following fly-out:

Please allow for minimum 5 minutes between activation and deactivation when you’re working on it, as the minimum active time is 5 minutes. After deactivate is complete, you will see your privilege disappear from the “active assignments” tab in the PIM overview.
Configuring privileged Identity management
First of all, start with two groups:
PIM approvers group
<Administrative role> eligibility group
These groups are the backbone to a good PIM implementation. The first one is used to configure who are allowed to approve requests, and the second one is used to provide allow access to the role in question. Here is an example of the second one:

The first thing to remember, except from the standard “always write clear and understandable descriptions” is to flip this one:

You are not supposed to assign a role to it YET, but if you don’t flip it, PIM will not be able to read it. You can NOT change this after group creation.
The PIM approvers group doesn’t need to have the “Azure AD roles can be assigned to group”, as the members of this group aren’t used to activate roles, just to provide a simple administration of the approvers.

Going back to the Privileged Identity Management panel, we’ll press Manage\Azure AD roles:

And then proceed to “Manage\Roles”:

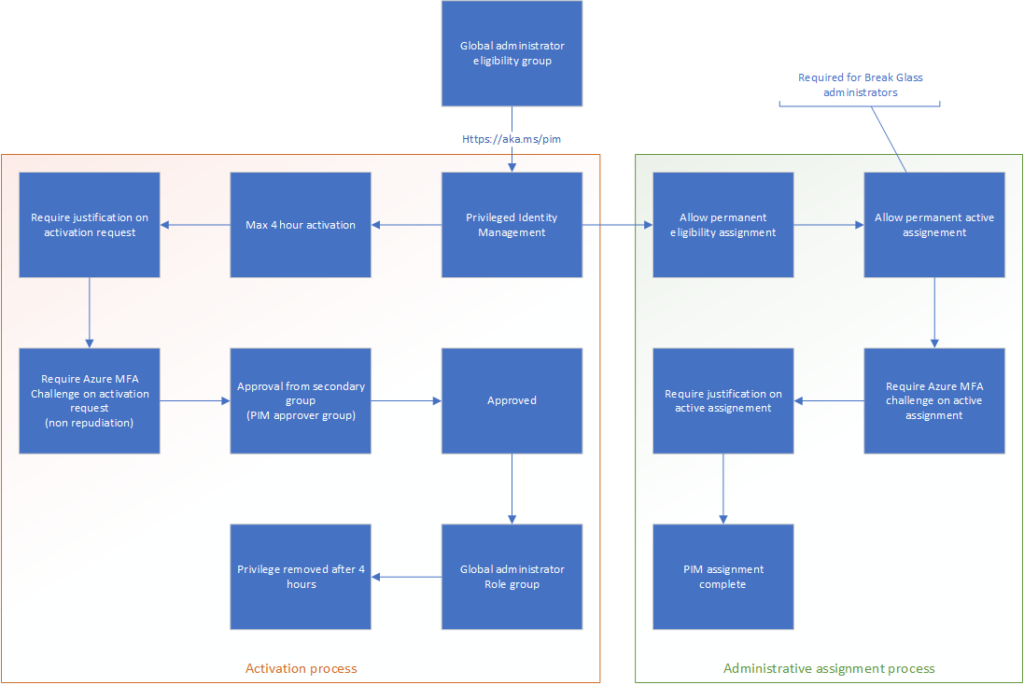
The reason for this is because we’re going to make sure the role is configured correctly before we assign the eligibility to anyone. We’ve made the Global Administrator eligibility group, meaning we’re assigning the highest privilege available for the tenant. You don’t do so half-heartedly or without risk. What we’re creating here is the following structure:

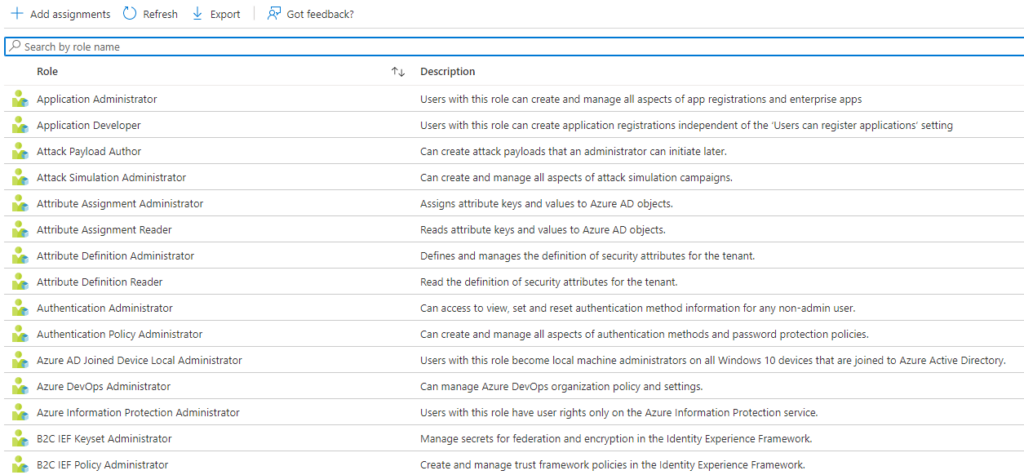
When you’re pressing the “Manage\roles”, you’ll get a large overview of available roles:

At the time of writing, there are 80 built-in privileged roles available. You can always create your own for your implementation, but that’s a different article.
We’re looking for the Global administrators role. You can always search for the one you need instead of reading the big list:

Pressing the “global administrator” role you’ll get the following menu on the left side:

We’re going to visit the “Role settings” first to make sure it’s set up correctly. There’s no such thing as a “one size fits all” solution for privileged identity management. Case and point is the activation time:

The page you’re getting when you visit “Role settings” is comprised of five areas:
– Activation
– Assignment
– Notifications on eligibility
– Notifications on active assignment
– Notifications on activation
Going on to edit the role in the structure you’ll find the following:

This covers the first part of the overview: Activation. First you can choose how long the maximum allowed activation duration can be. This is often up to the organization’s own business requirement, but I often argue 4 hours per activation is more than enough for the highest privilege in the tenant. If you need more time, you should use less privileged administrative roles or several PIM requests. Requiring Azure MFA should be done for all privileged roles in my opinion, as it provides non-repudiation.

If you sign the request with Azure MFA, you know the request was not sent by a malicious actor. If your malicious actor has managed to get a hold of your MFA, you’re having greater problems. The next bit is about justification. I showed how that works in the activation structure. If users can’t provide proper justification for the activation, simply deny it. If you add ticket information in the request, you can do ticket tracking as well as justification. These options are usually mutually exclusive, as there’s no real point in justification if you’re tracking the steps taken in the ticket system. Again, this depends on the business and compliancy requirements of the organization. As organization I’m working with here doesn’t use ticket tracking, the activation process looks like this:

Next, we’ll move on to assignment.

As I’ve designed in the concept drawing further up, there needs to be allowed permanent active assignments here to allow for Break Glass administrators. Read more about them in my article “Conditional Inaccessibility“. In other high administrative roles like “User Administrators”, “Security Administrators” and “Exchange Administrators”, you should consider removing the allowance for permanent active assignment, leaving no users with the role permanently assigned. This would protect you from stale administrative assignments, making sure all privileged assignments are presented through the PIM interface (except form Break Glass Global Administrators).
Require Azure MFA on active assignment require MFA from the approver when, leaving no question of non-repudiation for the approver as well. Requiring justification on active assignment means the approver need to provide justification when accepting the request as well. Here’s what I configured in this POC:

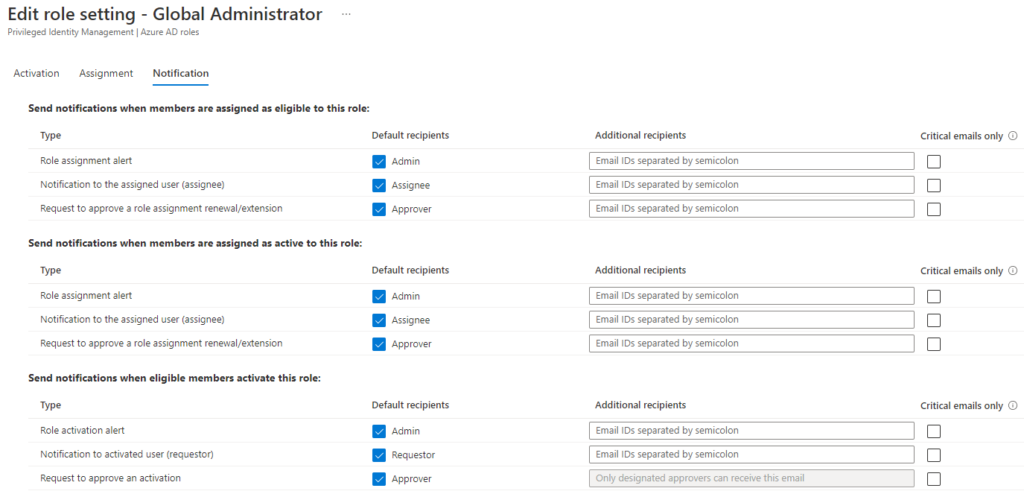
Moving on to Notification we have the following:

I often leave the standard configuration here, as it provides normal notification structures where everyone gets emails for every action. It’s simple and easy to maintain. You may however add more users to the role activation alerts if you want all of your administrators to be involved. More information is often better than less information.
Assigning eligibility
We’ve configured the role to function as we’d like. Now we’ll have to configure the eligibility. Luckily, this is extremely simple. Moving to “Manage\Assignments”:

Here we’ll go to:

Under the “Eligibility assignments” tab. Pressing the button you’ll get the following page:

As we accessed the assignment page from the role context, the role is already configured. If you access it directly from the PIM overview, you’ll have to chose what role you’re looking to configure first. Notice too, how “Scope” is already set. This is because you can’t have Global administrator roles in Administrative Units. The GA role is always scoped with the full directory. Select the eligibility group we created above as the selected members, leaving the page looking something like this:

Press “Next” and you’ll be brought to the following page:

I see no issue with these settings. Press the “Assign” button:

Congratulations! You’ve successfully configured your first role in Privileged Identity Management! Now keep repeating these steps until you’ve covered all of the administrator roles your organization requires.
Access reviews
When you’re done with configuring the groups, you should configure Access Reviews to maintain the eligibility groups. In Azure AD identity governance we’re looking for “Access Reviews\Access Reviews”

Here we’ll press the following button:

You can of cause take different routes to get to the same place. In the group itself, you can press the: “Activity\Access reviews”, and then follow up with
“+ New access review” from there:

When you’ve pressed the button you’ll be presented with the following page:

You’ll be asked if you want to review access to an application or if you want to review access to a team or group. Reviewing access to applications are done when you want to restrict access to applications containing sensitive information. This can be done as long as it uses Microsoft as the identity provider (idp), meaning it’s registered as a Azure AD Enterprise Application with Graph API privileges (I’ll cover this in a later article). We’re mainly looking to review a specific group like this:

The reasoning is simple:
– You don’t want to review all groups with guest users.
These reviews are used to look for guest users, either to remove them emtirely or remove their access from groups/teams.
– You don’t want to review only guest users
As you’re probably looking for organizational users, but you want to make sure you get an overview of everyone.
– You’re not trying to weed out inactive users, meaning the latest checkbox is unnecessary.
Press the “Next: Reviews” button.

You’ll want the Access review to run regularly. Multi-stage means you’ll have several steps for each review. If you have an CISO (Chief Information Security Officer) who want to be involved, you could consider having a second stage where the CISO get to review the IT department’s review. In this logic, the last review is the final result.
In the organization I’m configuring this proof of concept in, there’s only one IT administrator. This allows me to use the PIM Approvers group as the reviewer group as well. This would leave the reviewers settings like this:

We could however allow the users themselves to evaluate their own access. It’d look like this:

However, it could end with a higher license cost, as the license consumption is defined by the amount of reviewers, not the users reviewed.
In the recurrence settings you’ll configure how long a time the review itself can take, and how often you want to do the reviews, and whether you want the reviews to ever end. I’ve configured it like this:

Next up, we’re configuring settings:

These are the default configuration, but we’ll make some changes.
First of all, when the “Upon completion settings”:

You’ll want to auto-apply the results to the resource. Your review will be authoritative on allowing or denying access to the resource evaluated. I’m adding some users to send the “post review” log to, but it’s not necessary to show for this article.
Moving on to the “Enable reviewer decision helpers”. It isn’t necessary here, as the users will constantly log on (the users assigned to the group are usually the users’ day-to-day accounts). The function will however be very helpful when you’re evaluating for stale guest users objects.

When it comes to Advanced settings you decide whether the reviewer need to provide justification for allowing a user retaining the access. Email notifications is for the reviewers being informed of a review starting. Reminders are the same, but are sent in the middle of the review. Additional content is used to define what review you’re sending notifications for.

Justification in this setting are especially important in cases where users review themselves. In the organization I’m configuring for here there is no need for justifications in the review (as there’s only one IT administrator). Lastly you’ll need to name the access review and add a description:

Press “Create”:

When the review triggers, you’ll get the users listed out and the reviewers can press “approve” or “deny” access. After the review is complete, the system will deny access to the group, removing the users from the eligibility groups and successively from the Privileged Identity Management function.
Well done! You’ve configured privileged identity management with an Access review to maintain the group!
Thank you for reading